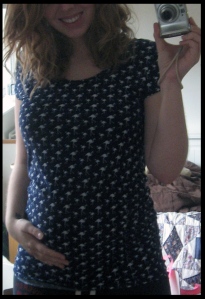
Pregnancy Update 29 weeks.

 Hi everyone, so after a lot of deliberating I have chosen to start fresh with a new blog.

When I first started this blog I wasn’t really sure what I wanted to write about & because of this I chose to use my own name as my blog name. Now that blogging has become a regular occurrence I decided to look back at all the different posts I have published & I realised that there are two subjects that I write about the most: Beauty and Pregnancy. I had no idea that I would enjoy blogging as much as I do, but I am well and truly hooked & I feel that now I know what I enjoy writing about the most I should really have a blog name that reflects those subjects. I chose Glitz & Pram.

I will continue to write about the same subjects that I have been on here, and I hope that you will continue to enjoy reading what I post. If you do want to continue following my blogs (I really hope that you will) you can do so here: http://www.glitzandpram.blogspot.co.uk/ or here: http://www.bloglovin.com/en/blog/4578751

I am so glad I found the courage to start publishing my thoughts, I will continue doing so for as long as I feel that I have something to say and at least one person finds those things interesting.

Dear Zoo Baby Clothes

I love getting surprise items through the post; there’s something so simple about a envelope or box with your name and address on and not having a clue what might be inside. Yesterday was one of those rare days when this happened.

I was having a bit of a moody day (hormones) so I almost walked straight past this little gem, but even in “baby rage” I recognised Val’s handwriting, so of corse I had to see who she’d written to. Initially when I saw my name I was worried that I had left a pair of dirty knickers at their home the last time I visited, and she was posting them back with a card retelling how a friend had found them under the pillow. (Is it just me that plays out these sort of scenarios in my head?) Thankfully that wasn’t the case, what was actually in the envelope was two TEENIE TINY baby vests!


They are 100% cotton & have 3 poppers in the crotch area to make it easier for changing nappies. They’re gender-neutral which is absolutely perfect as we chose not to find out the gender until birth, but my favourite part is that they are “dear zoo” print. I used to have Dear Zoo read to me when I was a baby & although I can’t remember the gist of the story I can absolutely recognise the print for what it is.

The vests were a set of two from Sainsbury’s Tu collection, I haven’t personally seen any in our local supermarket & I can’t find them online, but I do know that they were initially released to mark the 30th anniversary of Rod Campbell’s book. I cannot wait to see little-one wearing these & I cannot express how thankful I am to Val & Grey for sending us them. I also received a similar package from them a few weeks back with the matching baby grow & hat which is equally as precious & is finished to the same high standard as the vests.

I am absolutely overwhelmed with gratitude for the amount of love and support we have received from family and friends & I feel very privileged to be surrounded by so many amazing people. I will continue to post blogs surrounding items that we buy & receive, and will always give my honest opinion on the quality of the items. I’m sorry I couldn’t find an online link to these – I think they would be absolutely perfect for any new born & would make ideal gifts to give at a baby shower. Hopefully if you like them you will have luck in finding them when out shopping. 

Maternity Jeans

So, I caved: I bought a pair of maternity jeans. I knew I would have to give in eventually and invest in something stretchy, but I still still felt so guilty while paying for them that I nearly ran out of the shop. We haven’t finished (well, started really) shopping for little one, and we still need to get some essentials (fridge/freezer, washer/dryer etc) for the house, so in comparison my leg comfort seemed pretty low on the priority list. But barely anything fits anymore, so I had to pull on my belly friendly dress & tights and ‘haul-ass’ to the mall.

The jeans that I bought are the MAMA jeans from H&M (http://tinyurl.com/bghblmh). They are a stretch denim in a “low cut” style with a jersey ribbing that sits over the bump & will stretch with you. Because of the low cut style they’re very flattering and you never have to worry about your knickers hanging over the waist line because you’ve got the jersey material coming up a lot higher which I almost wish was a feature in all jeans (no more builders bums EVER.) I paid £29.99 and although that’s super cheap in the world of jeans I still wasn’t sure if I should be buying them. But OH MY GOSH am I glad I did. Wearing them is like being hugged ALL the time, in the best way possible. 

I’m still super glad that I didn’t cave and buy any maternity wear until now, but all traces of buyers guilt have completely disappeared. I don’t think I need more than one pair at the moment but I am likely to be living in these until I pop & if I do feel that another pair would make my life easier I would happily part with my cash for a second pair & I would recommend them to anyone. 

Pregnancy questions & bump (28 weeks)

This week has been a bit of a blur & I don’t feel like I’ve done anything outstanding, but I do feel really very pregnant. I feel: uncomfortable, heavy, clumsy, and utterly exhausted. Usually if I felt just one of those things I’d be complaining, a lot, but I’m perfectly happy and content: It’s almost as if all of the niggles make the pregnancy more real.
Yesterday was the first day of my third trimester which is both exciting and terrifying – we’re going to start buying the majority of the items we’ll need for ‘little one’ in the next few weeks, so I will be posting blogs showing you what we’ve got. I love that I can share our journey with you & wether it’s just curiosity, bringing back memories, or comparing your own pregnancy that makes you decide to read : I hope that you find these posts interesting & I’d love to hear your stories.
How far along? 28 weeks 1 day
Waist measurement: 35.5 inches (same as last week)
Measurement at belly button: 38 inches (same as last week)
Maternity clothes: Nope, but I’m going bra shopping tomorrow (thank goodness) and I may cave in and buy some maternity jeans while I’m at it.
Stretch marks? None, which may be down to the lack of inch gain. But I’m now in my third trimester which means things go pretty crazy from here on out.
Sleep: What’s that?
Best moment this week: We received our contract through for our house. Somehow that made it all so much more real.
Miss anything? Tummy sleeping. I miss  it so much, side sleeping is not for me.
Movement: Little & often, mostly in the evenings. Baby kicks me in the ribs now, mum says it’s karma for how often I used to do it to her.  
Food cravings: I craved mellon. Sort of. It wasn’t an overwhelming need, but i did enjoy it all the same.
Anything making you queasy or sick? Not unless you count George’s curry farts. ha.
Gender: Either a boy or girl I hope… (running out of new answers here)
Labour signs: Nada.
Symptoms: The worlds worst RIB PAIN. On my right side, it is becoming unbearable & apparently will not subside until birth. No sleep for me then.
Belly button in or out? It’s still a funny in-between, I have decided that I will only count it as an outie when I can see it through my t-shirt.
Happy or moody most of the time: Happy, but exhausted.
Looking forward to: Being able to “nest” properly. This won’t be for a while, but I can’t help but look forward to it anyway. It’s been odd having nesting instincts but no place to nest.

Upcycling jumpers into cushion covers (DIY)

At least once a year I will go through my clothes and put the items that I don’t wear any more in a bin bag & store them in the loft. I’ll then get my bag from the previous clear out and go through the items in there. The items will then go into three piles: clothes that I want to wear again; Clothes for the charity shop; and clothes for upcycling. This time around I found a lot of clothes that I wanted to upcycle & so I thought it might be fun to do a little DIY blog.

One of the jumpers that I found was a Primark purchase from a while back that I don’t believe I ever wore because firstly: it’s not really my style; and secondly it’s most certainly not my size (I’m a UK 10-12, it was a UK 6)- I think I must have been having a bad shopping day. Ordinarily I would probably give away an unworn item to a friend or a charity shop, but because baby is on the way I thought it would be nice to make something for the nursery. It would be really easy to cut along the seam and make a simple but cute blanket, but I already have my baby blanket that my nan knitted me, and so I decided to make a cushion cover. As always: if you do decide to make this please let me know how you got on & feel free to ask me any questions if you need anything clarifying. Good luck!! 😀

What you’ll need:

  • One old jumper (for this bow design I used a roll neck knitted jumper)
  • A needle & thread in a similar colour to your jumper (a sewing machine may make some parts easier, but you will need to hand stitch certain parts – I chose to hand stitch throughout)
  • A square cushion pad, roughly the same size as the body of your jumper.
  • Pins
  • Fabric scissors
  • Buttons or a Zip (optional)

Step by step:

  1. Lay your jumper flat on the bed & turn inside-out.
  2. Take your fabric scissors & cut along the neck seam to separate the roll neck from the rest of the jumper.
  3. Pin a straight line from shoulder to shoulder & stitch just bellow this line & turn jumper right side out.
  4. Cut along the seam of your roll neck to open it into a rectangular shape of cloth.
  5. Pin down the three edges that you have cut & securely stitch a hem (the top of the roll neck will already be hemmed.)
  6. Pin a straight line down the centre of your jumper to establish a middle point.
  7. Bring the right sleeve to the centre point (it should cross the body of your jumper diagonally) and stitch to the front of the jumper (be careful not to sew through both sides) cut off any excess material & discard.
  8. Bring the left sleeve to the same centre point and pin a straight line (parallel to the top) across the sleeve – your left sleeve should be pinned in line with the bottom of your right sleeve & the excess sleeve should be hanging straight down, there should be enough excess sleeve to allow you to fold upwards & create the centre of the bow shape.
  9. When you are happy with the placement stitch just bellow where you pinned.
  10. Fold your strip of material made from the roll neck in half along the shorter edges & roughly pin so that you have a thinner rectangle shape (make sure that you fold the material so that the edges you previously hemmed are on the inside & hidden.)
  11. Find the middle of the material then – only at this center point – sew the two edges together. Now when you unpin the long edge you should be able to see the shape of a bow forming. 
  12. Place the material on top of both sleeves, ensuring that the center point that you sewed together earlier is exactly on your pinned center line & just above the sewed line of your left sleeve.
  13. Pin the four corners down into place (make sure all of your seams are touching the body of the jumper, so that they remain hidden). When you’re happy with the placement: sew the four corners down. 
  14. Create pleats in the bow by making an “m” shape with the center material. An easy way to achieve this is to place one hand under the bow and the other on top & press down. When you have the desired pleat: secure by sewing the middle point down.
  15. Bring the left sleeve over the top of your bow to create the centre, pin & sew down – the neatest way is to ensure that you pull the sleeve under & around the bow.
  16. To ensure that you get a bow shape that stays looking like a bow: pin & stitch any area that you feel needs to be secured, but don’t sew around the entire bow as this will stop the material from stretching correctly.
  17. Remove all pins & finish by adding either a zip or buttons to the bottom of the jumper. Or if you would prefer a simpler solution: stuff with your chosen pad & stitch closed. Fluff up & enjoy.


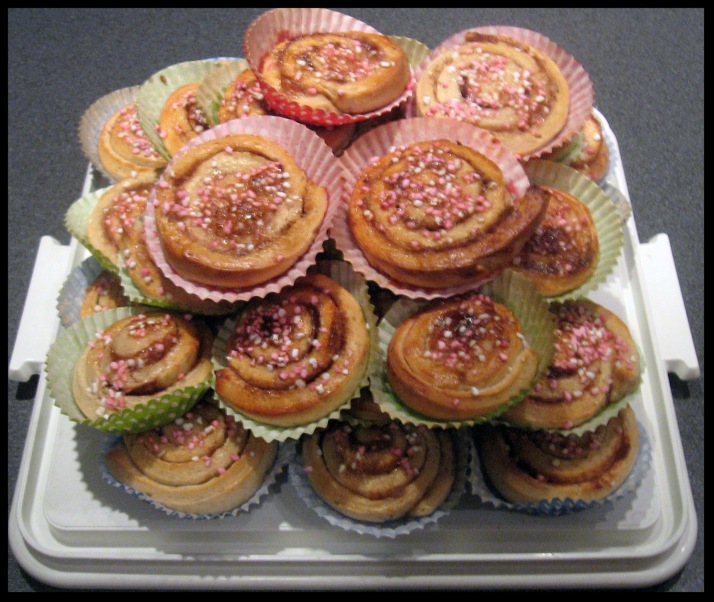
Baking Kanelbullar (cinnamon buns)

I did a bit of baking today because every Thursday George works until 8PM and after all the clothes washing I didn’t fancy using the rest of the day to clean (yepp, I am slowly becoming a 60’s housewife). When we were preparing for Swedish Christmas I excitedly told him that we were going to make Saffron Buns and his reply was something along the lines of “cool, when are you going to start making cinnamon buns?”

Needless to say they’re a firm favourite of his and as they’re not a Christmas treat we didn’t make any and he was gutted. So as I am a trainee domestic goddess I decided to surprise him and make some today. He’s not home yet so I have some more free time alone and I thought it might be nice to blog the recipe & instructions incase someone might like to try them for themselves, I think they’re perfect with a cuppa. Good luck if you do try them & I would love to know what you thought & how you got on.

What You’ll need:

For the dough: 

  • 150 g – Butter
  • 500 ml – Milk (I use semi-skimmed – 1.8% fat)
  • 50 g – Fresh Yeast
  • 1 tsp – Salt
  • 100 g – Sugar
  • 875 g – Plain White Flour
  • 2 tsp Cardamon – shelled and ground (optional)

For the Filling:

  • 100 g – Butter
  • 100 g – Caster Sugar
  • 2 – 4 tbs – Ground Cinnamon

For the Glaze:

  • 1 Egg (beaten)
  • Pearl Sugar (also known as Nib Sugar)

Tools & Utensils:

  • Scales
  • Measuring Spoons
  • Pestle & Mortar (If including cardamon)
  • Saucepan
  • Thermometer
  • Mixing Bowls
  • Whisk with Bread Hooks (or wooden spoon if preferred)
  • Rolling Pin
  • Fork or Small Whisk for egg
  • Knife for buttering & slicing
  • Glazing Brush
  • Cupcake Cases (aprox 50)


Step by Step:

  1. Remove cardamon from pods & grind to a fine powder.
  2. Melt butter on a low heat, when all melted add milk, remove mixture from heat when it reaches 37 degrees Celsius & pour into a large mixing bowl.
  3. Rub yeast between forefinger & thumb to break down into a fine crumb, add to mixing bowl.
  4. Add rest of ingredients (save a small amount of the flower for later) & mix well until all ingredients are combined & dough becomes shiny.
  5. Place a tea towel over the mixing bowl and allow to prove for 30 minutes.
  6. While dough is proving remove butter from fridge to soften & arrange cases onto baking trays.
  7. Sprinkle flour onto work surface & split dough in half & knead one section and roll into a rectangle shape (aprox 25X50 cm).
  8. Spread half of the butter onto the dough (as your would a slice of bread) and sprinkle over half of the sugar & cinnamon.
  9. Starting at the longer end roll into a cylinder.
  10. Cut into roughly 24 cylinder shapes & place into cupcake cases – allow to prove for a further 30 minutes under a tea towel.
  11. While proving turn oven on to 225 degrees Celsius & beat egg for glaze.
  12. When proved: brush on egg and sprinkle over pearl sugar.
  13. Place one baking sheet at a time on middle shelf of oven & allow to cook for 7-8 minutes until golden brown.
  14. Allow to cool on a wire rack & enjoy.

2013 – Getting Organised.

Happy New Year Everyone!!! I hope you all had an amazing night welcoming in the new year & I hope you all have fond memories of 2012 that you’ll carry with you forever. 

I make a new years resolution every year: I can barely ever remember what they were by the end of the year and I’m sure I’ve never kept one, but I love thinking ahead and choosing something that I believe will challenge me, or shape me into a better person. Usually I have no trouble thinking of something, so come midnight I will have my optimistic and naive resolution ready to write somewhere and promise to keep. This year my mind was utterly blank.

As I’ve mentioned in my past posts there are so many special things happening this year. I feel excited by everything that is going to happen & yet I don’t remember a past year ever having such high expectations put on it before it has even began. I am utterly terrified by the prospect that this may be “the biggest year of my life” to date & because of that I couldn’t think of any one thing that would be fitting for my resolution. So instead I decided to take some time to make a list of things that I hope I will be able to do in 2013 that go beyond my usual “no stupid haircuts this year”.

In 2013 I will:

Buy a house. This one might seem like a bit of a cheat because it’s already on the cards, but I feel that it’s important to include because if I don’t put in the time & effort that it takes to organise everything it cannot happen. There are so many things that can go wrong when buying a house & it’s become almost a part time job over seeing all the different stages.

Continue to post on my blog. This is super important to me, I’m really enjoying taking time out to write about things that I love & things that I’m doing or going through. I feel so lucky to have some spare time on my hands at the moment & posting on my blog has really quickly become something I look forward to doing. It’s almost become an online diary, I don’t know where it might lead but for now I’m enjoying rambling for rambling’s sake.

Be a good mum. I nearly didn’t include this one because it”s such a broad subject & no one can be a “good” parent in everyone’s eyes. But it’s something I want more that anything, so rather than not including it I’ve decided that I will probably write a separate post on it at some point this week.

Appreciate the little things. I always love the days where me and George just sit in front of the TV or go for a walk, & I love nights at the pub with friends, & spending Sundays with my family. I sometimes forget how special those days are.

Get Organised. This is a running theme throughout my life right now & something I had never previously put that highly on the list of things I find important. Now, I understand that without being organised the things that I want to do will probably not happen. This is my main resolution & without it I don’t think any of my others would be possible. I will probably write a separate post about this too, because I have so much to say, and lots of great tips that I have learnt, and if I write them all down I may find them easier to do.

And that’s it: 5 things that I hope to be able to do in 2013. It all seems so simple now that it’s written down, but I know that it’s going to be easier said than done & I can’t use the excuse I’ve forgotten what I said I wanted to do, because it’s right here for the world to see. Do you have a new years resolution? Do you ever manage to stick to them?

I hope you have an amazing 2013 & let me know what your resolutions are in the comments bellow & maybe we can encourage each other to keep them. Good luck & Happy New Year again. 

Get ready with me – New Years Eve

It’s nearly 2013!!! It’s going to be a massive year for our family so I’m really excited to start it.

I love getting ready for New Years eve & I tend to make a bit more effort than usual, mostly because there tend to be a fair amount of cameras around. I wanted some sparkle in my makeup (of corse) but I didn’t want to go over the top so I decided on a subtle gold smokey eye & gold nails. Gold pigments look really lovely on blue eyes & I think this look could be great for any night out, not just New Years so I wanted to take some photos & make a Step-By-Step guide to the look, to help you recreate it if you fancy. What ever you’re doing tonight I hope you have fun seeing in 2013! Happy New Year!!! 

Products I used:


Eyes: Urban Decay Primer Potion http://tinyurl.com/ckwz9lj

Barry M Dazzle Dust (100 & 101) http://tinyurl.com/bcvsjff

Bobbi Brown Gel Liner (Black Ink) http://tinyurl.com/2w36fn3

L’oreal Volume Million Lashes (Extra-Black) http://tinyurl.com/44bm25h

Shu Uemura Eyelash Curlers http://tinyurl.com/7t2qlw5

Face: Mac Face & Body Foundation (C1) http://tinyurl.com/cb4rbwl

Vichy Dermablend Foundation (15 Opal) http://tinyurl.com/cknowos

YSL Touche Eclat (2 Luminous Ivory) http://tinyurl.com/d7b7yn5

Arbonne Blusher (Dusty Rose & Merlot) http://tinyurl.com/bnznv9g

Nails: Barry M Nail Varnish (Gold Glitter) http://tinyurl.com/c262e7o

Pregnancy Questions & Bump (27 Weeks)

I posted this not long after I woke up this morning & the bump shots are literally JUST after I rolled out of bed, so apologies in advance for bed hair, bed face, sleepy typing mistakes. The maternity top is from Debenhams as part of their “Red Herring Maternity” collection, I don’t think they’re selling it at the moment so I couldn’t include a direct link, but here’s a link to their full range: http://tinyurl.com/bd9ujwh
How far along? 27 weeks exactly
Waist measurement: 35.5 inches
Measurement at belly button: 38 inches
Maternity clothes: I got my first maternity T-shirt for Christmas from my lovely Aunt & Uncle. It’s lovely & I’ve worn it a few times already, but I still haven’t bought anything for myself. 
Stretch marks? No, but the skin on my tummy is a little itchy which can sometimes precede stretch marks – so I’m being a bit more liberal with adding moisture.
Sleep: Waking up about 3 times a night at the moment & my hips are really hurting from side sleeping which is not cool. But hey-ho.
Best moment this week: Baby FINALLY kicked my dad (that seems like such a funny thing to be excited by) & of corse the entirety of Christmas was amazing, had such a lovely time.
Miss anything? My gums have been a bit “bleedy” & I don’t like that at all, I do miss that not happening & I’m looking forward to it subsiding.
Movement: Lots again & I’m not even a little bit bored of it. 🙂
Food cravings: No. I’m so boring. 
Anything making you queasy or sick? No smells or tastes, but I really truly HATE the sound of people eating & lip smacking & the cat cleaning. They all make me heave (stupid acute sense of hearing)
Gender: Well this week both George and I were saying that we think that it’s going to be a boy. I wasn’t sure if I should post that in case baby is a girl, but we change what we think all the time & that’s half the fun of not knowing. 
Labour signs: Nope, but I do keep dreaming about giving birth.
Symptoms: Tiredness due to not sleeping well & “bleedy” gums.
Belly button in or out? In, most of the time – it’s sort of inline with my tummy as I’m typing this..
Happy or moody most of the time: Happy, very happy this week. Christmas ensured that.
Looking forward to: Car seat shopping – a little bit lame BUT I haven’t been shopping for donkeys years, so I’ll take car seat shopping over nothing. Oh and I suppose seeing in the New Years might be a little bit exciting too.
 

If I had to start over (my perfect makeup starter kit)

I’ve been making lists of things that we will need to buy for the new house and for the baby, and it got me wondering what would be on my makeup list if I was writing one.

Both the house and baby lists are split by what’s totally needed and what would be nice, but considering makeup isn’t EXACTLY an essential I thought I would just make a post of what I would go out and buy if I had to start from scratch. I hope you find it helpful if you’re thinking of starting your own collection. I would have loved to have had a more sensible starting point to my makeup collection, I could have saved so much money. I wouldn’t ever suggest to anyone that they go out and buy their entire makeup collection at once, but if you want a good starting point: these are my absolute favourite beauty essentials.

Base: Mac Face & Body (C1)  http://tinyurl.com/cb4rbwl

Vichy Dermablend – I use this as concealer (15 opal) http://tinyurl.com/cknowos

Rimmel Stay Matte powder (transparent) http://tinyurl.com/bmc47rj

YSL Touche Eclat (2 Luminous Ivory) http://tinyurl.com/d7b7yn5

Cheeks: Arbonne Blush (Taffeta) http://tinyurl.com/bnznv9g

Nars Bronzer (Laguna) http://tinyurl.com/d7fu2xx

Eyes: Urban Decay Naked 2 http://tinyurl.com/c2xpeht

Urban Decay primer potion http://tinyurl.com/ckwz9lj

Maybelline Gel Eyeliner (black & brown) http://tinyurl.com/d6znel4 http://tinyurl.com/cx52bjz

L’oreal Volume Million Lashes (black) http://tinyurl.com/44bm25h

Eyebrows: Mac Pro Pallet (2) http://tinyurl.com/bmg78le

Eyeshadow pan (brun & omega) http://tinyurl.com/blf9dx9

Brushes & Tools: Arbonne Brush Set http://tinyurl.com/bnznv9g

Real Techniques Core Collection Brush Set http://tinyurl.com/crgdg3n

Shu Uemura Eyelash Curlers http://tinyurl.com/7t2qlw5

Lips: Mac Lipsticks (Teddy & Ruby Woo) http://tinyurl.com/6lpk63l